You got a new MacBook?
I’ve been using a MacBook Air with i7 CPU and 16G RAM since early 2021 for my personal jobs. But it cannot run any heavy tasks like live streaming, audio post production effeciently. And it killed the PowerPoint a few days ago when I was editing my slides.
There isn’t any problems when I work because most of my tasks are run on the MacBook which is from the employer. But I’d need to upgrade my MacBook so that I can handle most of my own things for side projects and to learn new technologies.
This time I chose the “old fashioned” 13-inch MacBook Pro with M2 chip and 24G RAM. I prefer its lightweight design and the Touch Bar. But you’d love your choice, right?
OK. Now let’s start setting up the new MacBook. I will cover system preferences, apps and development settings I use in this post. So if you’re a developer, you’d find it useful, hopefully.
System Preferences
Tips: You can rearrange icons in the menu bar by pressing
Commandthen drag them.
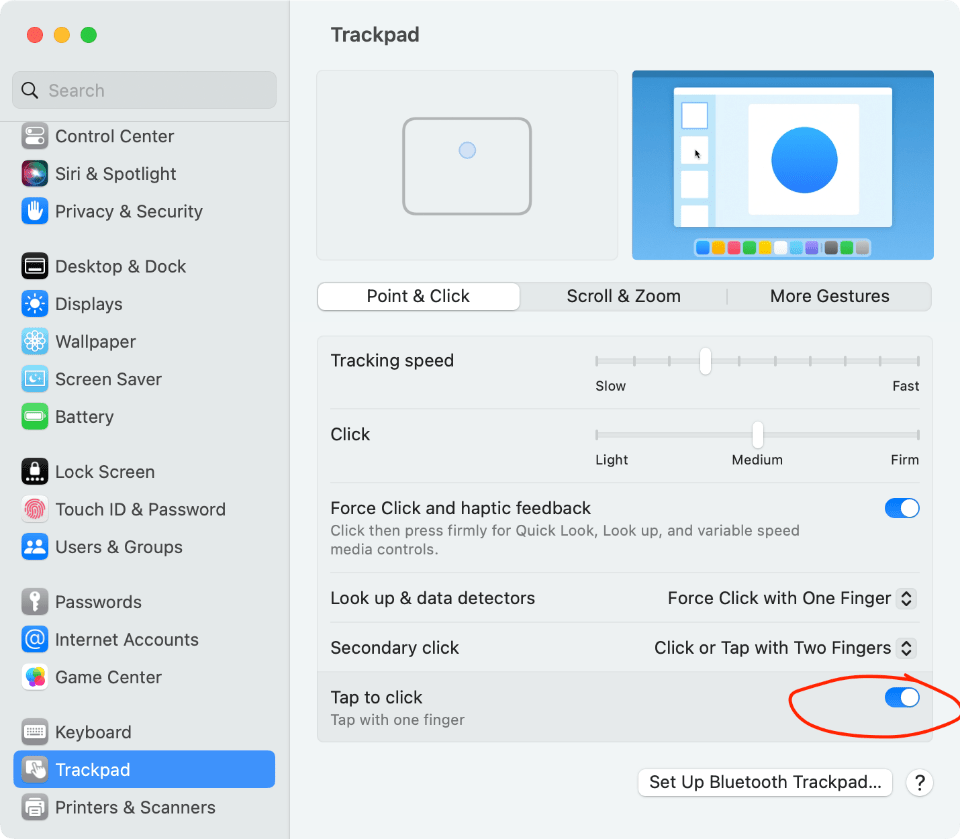
Trackpad
- Enable “Tap to click” under tab “Point & Click”.
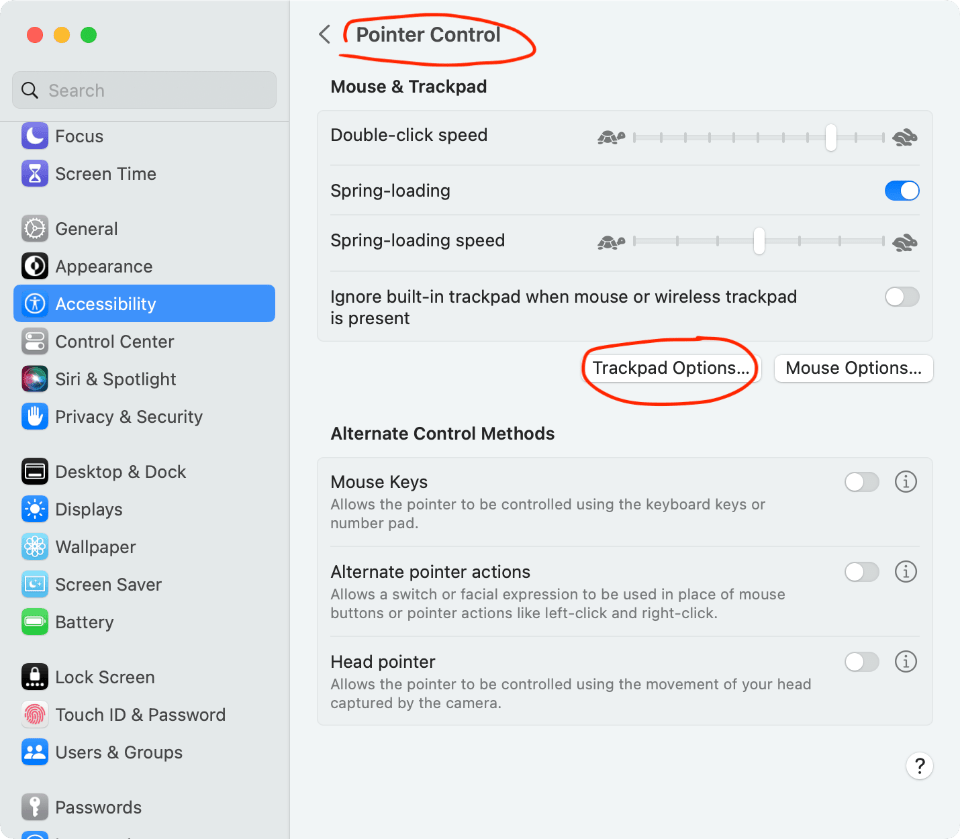
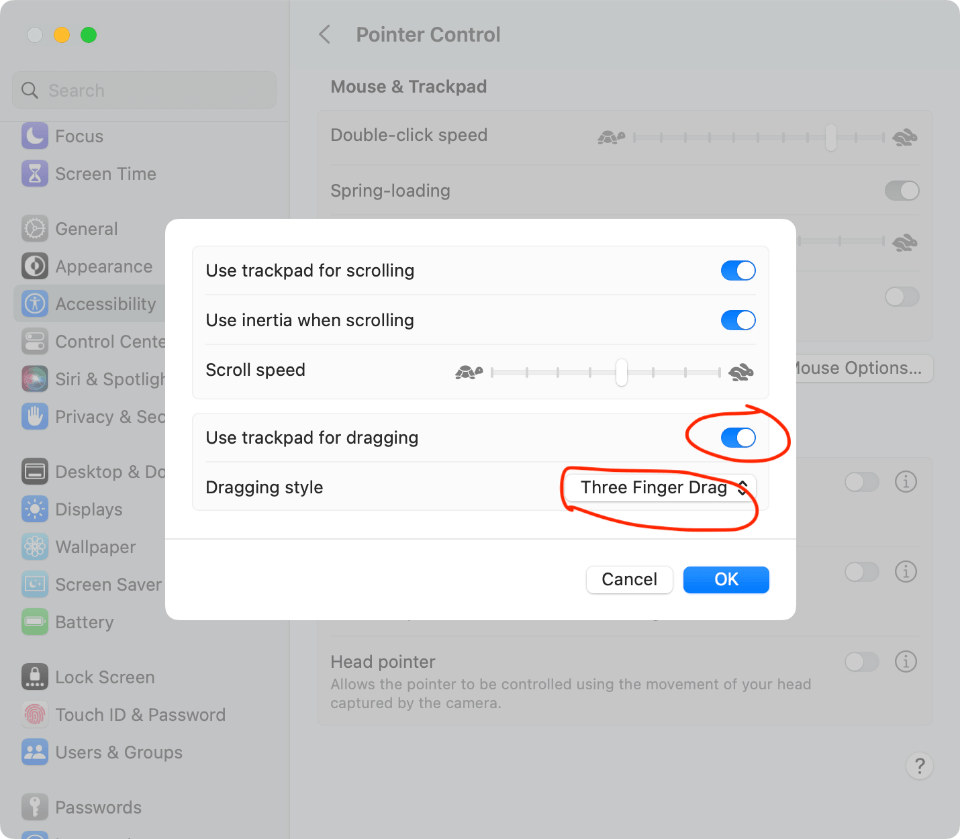
- Enable “Three fingers drag” style: Click the “Trackpad Options…” under “Pointer Control” of the Accessibility pane. Then enable “Use trackpad for dragging” and select the “Three Finger Drag” from the “Dragging style” list.
-
Disable “Notification Center” under tab “More Gestures”.
-
Connect Trackpad by clicking the “Set Up Bluetooth Trackpad…”. It is highly recommended to use an external Trackpad.
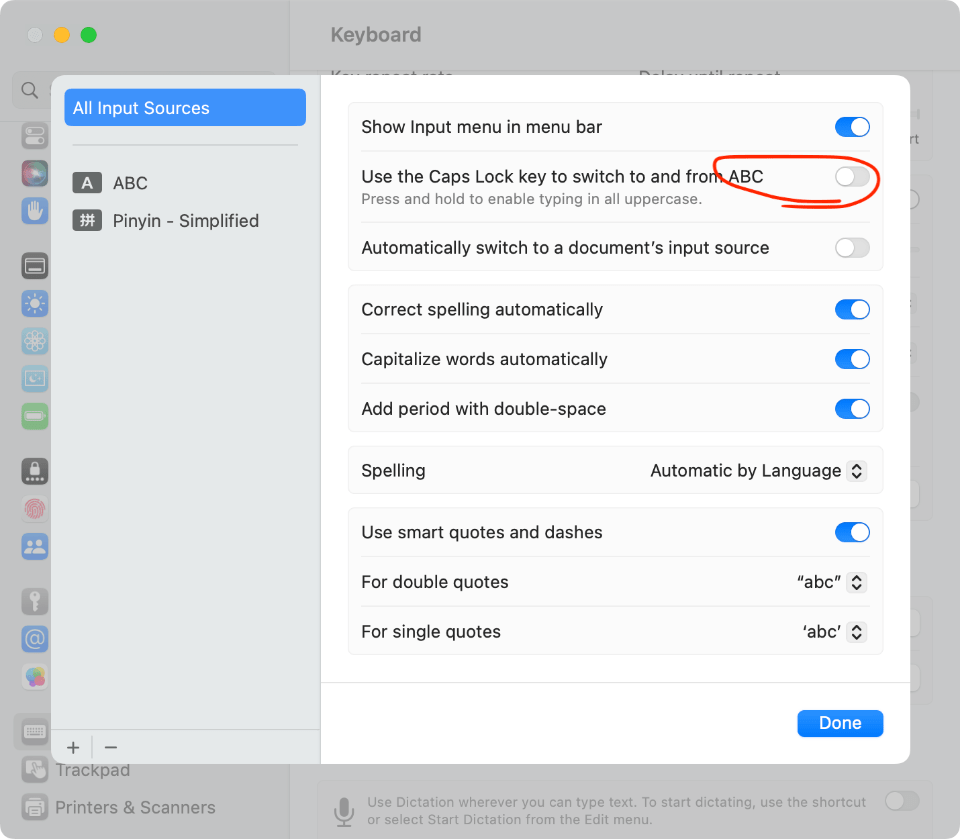
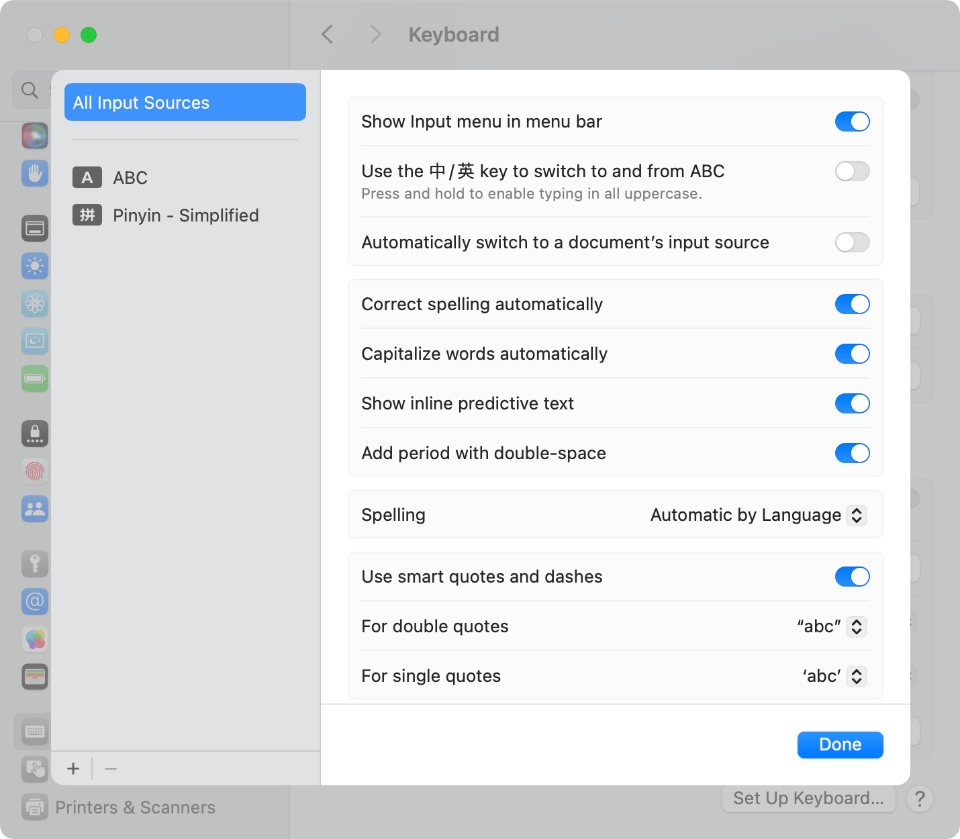
Keyboard/Input Method
- Disable “Caps Lock” (or “中/英” key if you’re using a Chinese layout keyboard) to switch input methods.
Dock
-
Make icon size smaller and enable magnification to a little bit bigger. You’d remove many icons as you wish.
-
Enable “Automatically hide and show the Dock”. This is my magic skill to use the maximum desktop area.
Equip the MacBook for building apps
Time to download some apps.
Install Google Chrome
You’d download the official Google Chrome from this URL if you’re located in China.
And then set it as the Default web browser under “Desktop & Dock” in the system settings.
Extensions I like
- Adblock Plus - Surf the web with no annoying ads.
- Hypercrx - Tracking, mining and insight into open source projects and developer relationships.
- Language Reactor - a powerful toolbox for learning languages.
- Immersive Translate - In place translation tool.
- FireShot - Take Webpage Screenshots Entirely.
- MetaMask - A crypto wallet & gateway to blockchain apps.
Install command line tools
Open the “Terminal.app” and run:
xcode-select --install
This package enables UNIX-style development via Terminal by installing command line developer tools, as well as macOS SDK frameworks and headers. Many useful tools are included, such as the Apple LLVM compiler, linker, and Make. If you use Xcode, these tools are also embedded within the Xcode IDE.
Note: macOS comes bundled with xcode-select, a command-line tool that is installed in /usr/bin. It allows you to manage the active developer directory for Xcode and other BSD development tools. See its man page for more information.
Anyway, It will bring you git, python3, ruby and much more tools for further steps and future apps developing works.
Install Fonts for coding
I prefer FiraCode for terminal and code editors. You can find more code fonts here.
The installation is easy, just need the TTF fonts.
And for some poster design works, I will use 抖音美好体 in the future.
为了鼓励更多的人们加入“记录美好生活”的行列,使人们能够轻松创作分享,抖音体验设计中心决定将抖音美好体面向全社会开源(OFL协议),个人、企业、商家均可免费商用,欢迎大家下载使用抖音美好体,抖音体验设计中心将一如既往地为用户打造优质的品牌、产品体验,欢迎大家持续关注!
Install iTerm2
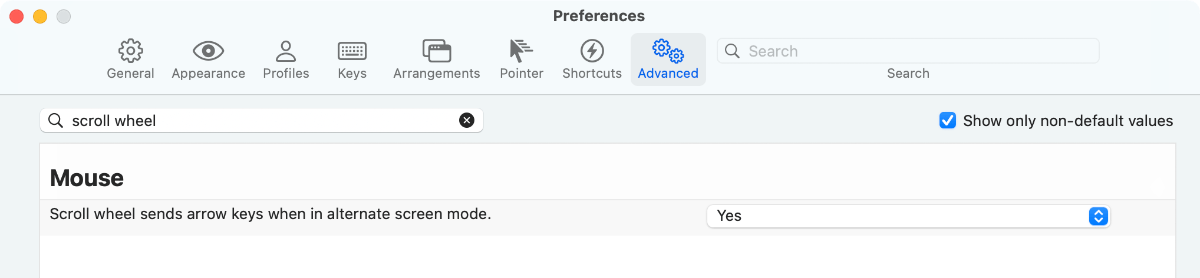
Enable scroll when editing file like nano. ref here.
I changed some settings for my profile.
Window size to: 120 x 32
Install Oh-My-Zsh
shiny@Shinys-MBP ~ %sh -c "$(curl -fsSL https://raw.githubusercontent.com/ohmyzsh/ohmyzsh/master/tools/install.sh)"
Cloning Oh My Zsh...
remote: Enumerating objects: 1367, done.
remote: Counting objects: 100% (1367/1367), done.
remote: Compressing objects: 100% (1317/1317), done.
remote: Total 1367 (delta 31), reused 1156 (delta 26), pack-reused 0
Receiving objects: 100% (1367/1367), 2.01 MiB | 1.73 MiB/s, done.
Resolving deltas: 100% (31/31), done.
From https://github.com/ohmyzsh/ohmyzsh
 * [new branch]      master     -> origin/master
branch 'master' set up to track 'origin/master'.
Switched to a new branch 'master'
/Users/shiny

Looking for an existing zsh config...
Using the Oh My Zsh template file and adding it to /Users/shiny/.zshrc.

         __                                     __
  ____  / /_     ____ ___  __  __   ____  _____/ /_
 / __ \/ __ \   / __ `__ \/ / / /  /_  / / ___/ __ \
/ /_/ / / / /  / / / / / / /_/ /    / /_(__  ) / / /
\____/_/ /_/  /_/ /_/ /_/\__, /    /___/____/_/ /_/
                        /____/                       ....is now installed!


Before you scream Oh My Zsh! look over the `.zshrc` file to select plugins, themes, and options.

• Follow us on Twitter: @ohmyzsh
• Join our Discord community: Discord server
• Get stickers, t-shirts, coffee mugs and more: Planet Argon Shop
Then update to your favorite theme by editing the file ~/.zshrc in line 11:
ZSH_THEME="mgutz"
Install Homebrew
/bin/bash -c "$(curl -fsSL https://raw.githubusercontent.com/Homebrew/install/HEAD/install.sh)"
Logs:
==> Checking for `sudo` access (which may request your password)...
Password:
==> This script will install:
/opt/homebrew/bin/brew
/opt/homebrew/share/doc/homebrew
/opt/homebrew/share/man/man1/brew.1
/opt/homebrew/share/zsh/site-functions/_brew
/opt/homebrew/etc/bash_completion.d/brew
/opt/homebrew
==> The following new directories will be created:
/opt/homebrew/bin
/opt/homebrew/etc
/opt/homebrew/include
/opt/homebrew/lib
/opt/homebrew/sbin
/opt/homebrew/share
/opt/homebrew/var
/opt/homebrew/opt
/opt/homebrew/share/zsh
/opt/homebrew/share/zsh/site-functions
/opt/homebrew/var/homebrew
/opt/homebrew/var/homebrew/linked
/opt/homebrew/Cellar
/opt/homebrew/Caskroom
/opt/homebrew/Frameworks

Press RETURN/ENTER to continue or any other key to abort:
And more:
Warning: /opt/homebrew/bin is not in your PATH.
  Instructions on how to configure your shell for Homebrew
  can be found in the 'Next steps' section below.
==> Installation successful!

==> Homebrew has enabled anonymous aggregate formulae and cask analytics.
Read the analytics documentation (and how to opt-out) here:
  https://docs.brew.sh/Analytics
No analytics data has been sent yet (nor will any be during this install run).

==> Homebrew is run entirely by unpaid volunteers. Please consider donating:
  https://github.com/Homebrew/brew#donations

==> Next steps:
- Run these two commands in your terminal to add Homebrew to your PATH:
    (echo; echo 'eval "$(/opt/homebrew/bin/brew shellenv)"') >> /Users/shiny/.zprofile
    eval "$(/opt/homebrew/bin/brew shellenv)"
- Run brew help to get started
- Further documentation:
    https://docs.brew.sh
Follow the “Next steps” above to configure the PATH for brew.
(echo; echo 'eval "$(/opt/homebrew/bin/brew shellenv)"') >> /Users/shiny/.zprofile
    eval "$(/opt/homebrew/bin/brew shellenv)"
Install GitHub Desktop
Don’t click the big button if you’re using Apple silicon CPU (M1 or M2) like me. You’d click the text under it.
Login with your GitHub account.
And correctly set your name and email for git in the Settings window. This will set your ~/.gitconfig as well.
Install Visual Studio Code
It’s a universal build. Great.
Configure to make it able to be launched from command line: code file.
Install .NET SDK
I personally prefer manually download it from get.dot.net and run:
cd ~/apps
mkdir -p dotnet && tar zxf dotnet-sdk-7.0.400-osx-arm64.tar.gz -C dotnet
Then update the $PATH:
~ % nano .zshrc

# User configuration

# .NET SDK
export DOTNET_ROOT=/Users/shiny/apps/dotnet
export PATH=$PATH:$DOTNET_ROOT
You can run source .zshrc to use dotnet in your current terminal session.
Install NodeJS
Same as above.
And Yarn too (with curl this time):
apps % curl -LO https://yarnpkg.com/latest.tar.gz
apps % tar zvxf latest.tar.gz
apps % mv yarn-v1.22.19 yarn
apps % nano ~/.zshrc

# User configuration

# Yarn
export PATH=$PATH:/Users/shiny/apps/yarn/bin
Install Go
Still stay the same as above.
Install Ruby
Do you remember that xcode-select has installed ruby? Haha but it’s a little bit outdated. Here I installed Ruby by Homebrew.
~ % brew install ruby
Running `brew update --auto-update`...
==> Auto-updated Homebrew!
Updated 2 taps (homebrew/core and homebrew/cask).
==> New Formulae
==> New Casks
You have 9 outdated formulae installed.
==> Downloading
==> Fetching
==> Installing ruby
==> Pouring ruby--3.2.2_1.arm64_sonoma.bottle.tar.gz
==> Caveats
ruby is keg-only, which means it was not symlinked into /opt/homebrew,
because macOS already provides this software and installing another version in
parallel can cause all kinds of trouble.

If you need to have ruby first in your PATH, run:
  echo 'export PATH="/opt/homebrew/opt/ruby/bin:$PATH"' >> ~/.zshrc

For compilers to find ruby you may need to set:
  export LDFLAGS="-L/opt/homebrew/opt/ruby/lib"
  export CPPFLAGS="-I/opt/homebrew/opt/ruby/include"
==> Summary
To use the newer version, let’s update the .zshrc as suggested above:
# Ruby (Installed by Homebrew)
export PATH=/opt/homebrew/opt/ruby/bin:$PATH
More Apps
Now let me list apps I use on my MacBook.
- AppCleaner is a small application which allows you to thoroughly uninstall unwanted apps.
- Keka - the macOS file archiver Store more, share with privacy.
- balenaEtcher - Flash OS images to SD cards & USB drives, safely and easily.
- ClashX Pro and Cloudflare WARP: Proxy services for some services.
- iTerm 2 - a replacement for Terminal.
- IINA - The modern media player for macOS.
- Typora or China site: Markdown editor.
- Obsidian - private and flexible writing and notes app.
- Xmind - The full-featured mind mapping and brainstorming app.
Evernote: Removed and not recommended.Notion: Removed and not recommended- Microsoft Office: install from Mac App Store. I have a family subscription.
- Apple Office: install from Mac App Store
- GitHub Desktop
- Visual Studio Code
- Docker Desktop
- VMWare Fusion
- Termius: install from Mac App Store - SSH platform for Mobile and Desktop
- JDK: Azul Zulu Builds of OpenJDK.
- DeVinci Resolve: install from Mac App Store
- WeChat: install from Mac App Store
- Slack: install from Mac App Store
- Discord
- Zoom
- Tencent Meeting: install from Mac App Store
- BespokeSynth - A modular DAW for Mac, Windows, and Linux.
- Studio One - Everything you need to record, produce, mix, master, and perform.
- Presonus Universal Control: Driver support, software control, monitor mixing, and firmware management for PreSonus hardware.
- RØDE Central - an easy-to-use companion app for compatible RØDE products that lets you configure your device settings.
- Sonic Visualiser - Visualisation, analysis, and annotation of music audio recordings.
- pixitracker - simple and fun tool to quickly create musical sketches, chiptunes and sound experiments.
#!/bin/zsh

source ~/.zshrc
./pixitracker/START_MACOS.app/Contents/MacOS/pixilang
- OBS - Free and open source software for video recording and live streaming.
- Elgato Stream Deck - control center (hardware required).
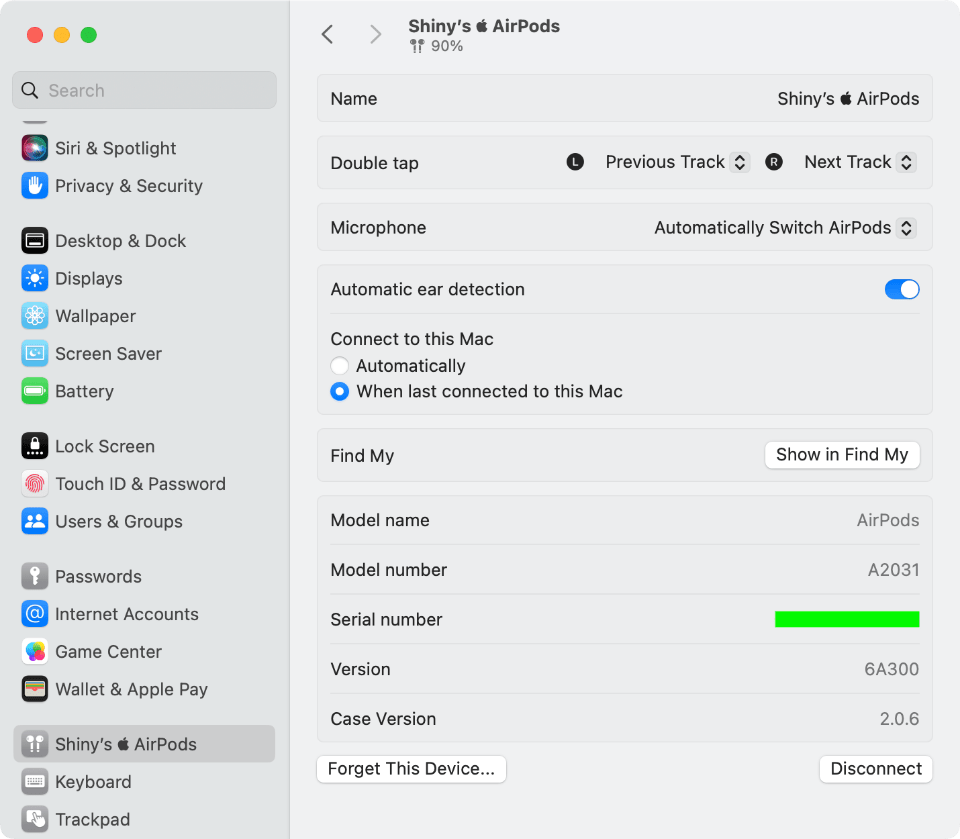
One more tip
I need to host live events or webinars sometimes. I use audio interface to handle audio loopback. And I also have AirPods which can automatically connect to MacBook. It will be annoying especially when you are in an event. So you’d better to disable the automatically connection.
Resources
I followed these posts for setting up my MacBook. You can check them out too.
- https://www.swyx.io/new-mac-setup
- https://www.taniarascia.com/setting-up-a-brand-new-mac-for-development/
- https://www.sqlsec.com/2023/07/ventura.html
- https://www.cnblogs.com/jinjiangongzuoshi/p/5373711.html
Any feedbacks and comments are welcome.
Last modified on October 25, 2023